Step 1 – Compression
Once you've completed your video in iMovie, it's time to compress it. Uncompressed digital video requires a great deal of space – compression tries to reduce the overall file size without reducing the quality too much. This is achieved through the use of audio and video codecs – which are essentially different compression algorithms.
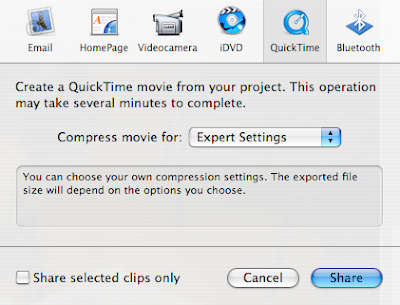
With your project open in iMovie, go to File – Share.
Click on the Quicktime icon, and choose Compress movie for: Expert Settings. Next, we're going to choose Broadband – High in the dropdown menu and name our compressed video. Click save – your video should begin to compress. The time it takes a given video to compress depends on the length of the video, the compression codecs used, and the speed of the computer.
 Step 2 – Uploading
Now that we have our compressed video, it's time to upload it! Once again, there are a number of ways to do this. A great number of video sharing sites have sprung up over the past few years – the ubiquitous YouTube being a prime example. I've experimented with several sites, including YouTube and Google Video, but at the moment my favorite is Blip.tv. The good news is that they're all pretty user friendly – once you use one of them it's pretty easy to figure out how to use the others.
The first step is to go to your video uploading site of choice – we'll be using blip.tv today. Once you're there, input your user name and password (we've created a ctep account for you to login with).
Once you're logged in, feel free to explore. When you're ready to upload your video, click on Upload.
The upload page is where you input in all of the information about your video.
Most of this is self explanatory. You enter in a title and description for your video and tell blip.tv where your file is stored. You can also upload a thumbnail (quick tip – apple + shift + 4 allows you to take a screen capture with a selection rectangle - the image saves to the desktop). You can also choose a license (if you want to find out more about using Creative Commons licenses, go here). Next we can tag and categorize our video. Use as many relevant tags as you can think of.
Finally, we have some options for cross-posting. I've set up the CTEP account to allow cross-posting to the new media committee blog and the CTEP MySpace. Check all of the boxes.
Now just click upload.
Step 3 – Posting it
Once your video has been uploaded, you can post the video on a number of different sites. Blip.tv is convenient in that it allows cross-posting, so your video will automatically be posted onto our blog and on MySpace. So you're already done with this step! But if you want to post it anywhere else, you're provided with html code that can you can paste into your own blog, your organization's website, etc. Just copy and paste this:
That's about it. If there are any methods/tools/sites that you've used and want to recommend, post about it in the comments!


No comments:
Post a Comment