We would like you all to take a moment to reflect on the Media Training Corps Day we had last week. We've come up with a list of questions for you to think about. Pick a couple of them and then write your response in the comment section of this post. If you'd prefer to respond with pictures or a video, e-mail one of us and we'll make sure it gets added to the blog. Now, onto the questions:
- What did you learn or what became more clear to you at the Corps Day training?
- What do you wish we had covered more in-depth?
- How confident are you in your ability to produce a video?
- After this Corps Day, are you more likely or less likely to consider producing a video for your work site?
-What was your response to the new media/blogging section of the training? Do you feel like any of these tools would be useful to you or your organization?
- If we were to conduct another media training, what sorts of skills/concepts would you be interested in learning more about?
Thursday, April 26, 2007
Monday, April 23, 2007
What they don't know

A short video about working in a CTC produced as part of a CTEP AmeriCorps training day.
The CTEP "Technolution"

Created as a Corps Day excercise, this video discusses the positive aspects of the Community Technology Empowerment Project.
Sunday, April 22, 2007
What is AmeriCorps?

A collaboration of the Communication Committee and the Volunteer Mobilization Committee, this was created during the April 19, 2007 Corps Day at SPNN. If anyone at AmeriCorps actually wants to use this for something, we'll be extremely surprised.

Friday, April 20, 2007
Your Assignment, should you choose to accept it...
1) Gain additional media production experience beyond that which was experienced at the media committee’s first video production training last winter;
2) Get “new media” experience in the form of uploading videos to the internet;
3) Create a video project that has relevance and utility for you personally, or for the CTEP organization of which we are all a part.
Think About …
Creating a video project that fulfill needs that you have at your site, that others in your small group have at their sites, or that CTEP has as an organization.
Here are some ideas for video productions you might create today:
1) Take this opportunity to reflect on your AmeriCorps CTEP experience and what it has meant to you. Think about questions such as:
a) How has your experience changed you?
b) What was best about your experience?
c) How was it like other jobs you've had, or different from other jobs you've had?
d) Do you have any advice for new CTEP members?
Create this video around one person’s reflections, or the reflections of everyone in your group. How might you creatively shoot and edit this video to effectively convey your feelings or your message?
2) Relate stories about your CTEP experience — whether inspiring, funny, or strange.
3) Create a promotional video:
a) For AmeriCorps CTEP, or
b) For your site or program
4) Produce an instructional video, such as:
a) A software tutorial:
b) A tutorial on procedures performed at your site;
c) Other instructional videos that could be utilized at your site, for use by clients, program participants, workers, or volunteers;
d) Informational or instructional videos to be utilized by new CTEP members.
Have fun!
Thursday, April 19, 2007
Review: Video Production Concepts
Stages of the Production Cycle
• Preproduction – the process of planning, organizing, scheduling all elements required to complete a successful production. This includes storyboarding, shot lists, scriptwriting and more.
• Production – the shoot itself, when actual filming takes place.
• Postproduction – the editing stage where all elements of the project come together to make a final product.
Composition and Framing Your Shots
• Rule of Thirds – Roughly put, this rule suggests that you can get more interesting composition by placing your subject off-center, a third of the way from the edge of your frame.
• Headroom – The amount of space above the subject. Too much headroom may make your subject seem short or sunken. Too little can make your shot appear awkward and unfocused.
• Lighting – Generally avoid having bright light behind the subject, which will overwhelm the image. Try to keep major light sources behind the camera.
• Tripods – Use one whenever possible if you want a stable, smooth shot.
Camera Shots
• Wide shot (Establishing shot) – This shows the whole scene, providing the view with visual context. Frequently you'll see video pieces begin with this shot.
• Medium Shot – This shot shows less of a scene than the wide shot. The camera seems closer to the subject. For example, if you were interviewing someone, this shot would show them from about the waist up in a medium shot.
• Close Up Shot – This shot shows an even smaller part of the subject or scene. It's great for showing detail, like a person's emotional face or individual leaves on a tree.
Shot Angles
Your shot angle is the level from which you look at your subject.
• Eye Level– This angle also causes the least discomfort because we're used to it. If you're shooting a person, make sure you shoot at their eye-level, not yours.
• Low Angle – In this shot, the camera looks up at the subject, making it seem important, powerful, or perhaps larger than it is to the viewer.
• High Angle – In this shot, the camera looks down upon the subject, decreasing its importance. The subject looks smaller. It often gives the audience a sense of power, or the subject a sense of helplessness.
How to Compress, Upload, and Post your Video
Now that you've created a video and we've talked about why internet video is useful, we're going to cover the how. How do you go about getting that video online? There are 2-3 steps involved, and there are many different ways to accomplish each step. This tutorial will cover just one possible way – utilizing iMovie, blip.tv, and Blogger.
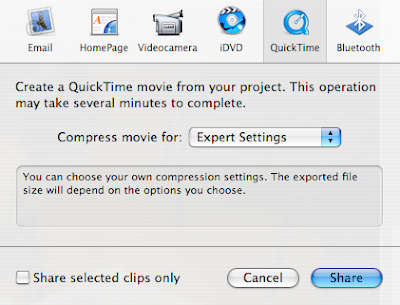 Next, we're going to choose Broadband – High in the dropdown menu and name our compressed video. Click save – your video should begin to compress. The time it takes a given video to compress depends on the length of the video, the compression codecs used, and the speed of the computer.
Step 1 – Compression
Once you've completed your video in iMovie, it's time to compress it. Uncompressed digital video requires a great deal of space – compression tries to reduce the overall file size without reducing the quality too much. This is achieved through the use of audio and video codecs – which are essentially different compression algorithms.
With your project open in iMovie, go to File – Share.

 Next, we're going to choose Broadband – High in the dropdown menu and name our compressed video. Click save – your video should begin to compress. The time it takes a given video to compress depends on the length of the video, the compression codecs used, and the speed of the computer.
Step 2 – Uploading
Now that we have our compressed video, it's time to upload it! Once again, there are a number of ways to do this. A great number of video sharing sites have sprung up over the past few years – the ubiquitous YouTube being a prime example. I've experimented with several sites, including YouTube and Google Video, but at the moment my favorite is Blip.tv. The good news is that they're all pretty user friendly – once you use one of them it's pretty easy to figure out how to use the others.
The first step is to go to your video uploading site of choice – we'll be using blip.tv today. Once you're there, input your user name and password (we've created a ctep account for you to login with).

Once you're logged in, feel free to explore. When you're ready to upload your video, click on Upload.

The upload page is where you input in all of the information about your video.

Most of this is self explanatory. You enter in a title and description for your video and tell blip.tv where your file is stored. You can also upload a thumbnail (quick tip – apple + shift + 4 allows you to take a screen capture with a selection rectangle - the image saves to the desktop). You can also choose a license (if you want to find out more about using Creative Commons licenses, go here). Next we can tag and categorize our video. Use as many relevant tags as you can think of.

Finally, we have some options for cross-posting. I've set up the CTEP account to allow cross-posting to the new media committee blog and the CTEP MySpace. Check all of the boxes.

Now just click upload.
Step 3 – Posting it
Once your video has been uploaded, you can post the video on a number of different sites. Blip.tv is convenient in that it allows cross-posting, so your video will automatically be posted onto our blog and on MySpace. So you're already done with this step! But if you want to post it anywhere else, you're provided with html code that can you can paste into your own blog, your organization's website, etc. Just copy and paste this:

That's about it. If there are any methods/tools/sites that you've used and want to recommend, post about it in the comments!
Wednesday, April 18, 2007
Why online video?
All right, class. Today we’re going to talk about posting the videos we’ve created onto the internet.
Vlogs: We’ve all heard about vlogs, or video blogs. The show with zefrank is a popular one. The Set It Up blog is a big hit overseas.
To promote an idea / spread an agenda: There have been a number of recent news stories about political campaigns utilizing online video. The Hillary Clinton / Apple ad mash up has been getting a lot of press of late (I just watched it for the first time as I was writing this post). One example that I think is particularly good in terms of conveying information in video form in order to promote an idea is Big Brother State, which deals with issues of privacy and surveillance.
Instructional Videos: This is an area that may very well be applicable to the work that you do at your site. Video can be used as a teaching tool. The other day, I had to wear a tie. I learned how to tie a tie when I was in Cub Scouts, but it was information that my brain seems unable to retain. I never remember how to tie them. So I did a quick search, and found this video. Problem solved. About once a month, SPNN posts a “tech tip” video online. This month’s tip is on using a light meter.
Outreach Tool: Online video can be used as an outreach tool for your organization or its programs. DoGooder.tv is a great example of this, as it allows people to watch videos created by non-profit organizations. “Once site visitors see the compelling stories of nonprofits, DoGooderTV gives them a direct way to donate to the organization, join, volunteer or simply find out more information.” Here’s one example: North Texas Food Bank. TechSoup has a great write up on promoting your non profit organization through video using free online tools.
And much more! Have you used online video in the past, either in your personal life or at your work site? Tell us about it in the comments!
Subscribe to:
Comments (Atom)